I think I could flip through seed catalogues all day.. every time I go to the mailbox, another one is there.. I'd love to order from them all, but my budget disagrees (darn budget!). Anyway, today, I just received the new 2011 seed listing from Renee's Garden (www.reneesgarden.com). I have long been a fan of this online seed company (no paper catalogue) as well as Renee Shepherd, the owner. Her company offers many gourmet veggies and herbs (heirloom and hybrid), as well as antique flowers like sweet peas, sunflowers and nasturtiums.
This year, there are some fun new offerings and here's a sneak peek of what I'm going to order (not that I need any more seed!):

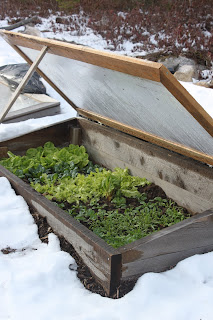
Tricolor Carrots 'Circus Circus' - I love carrots and so do the kids. We are able to harvest them year round, thanks to the cold frames and tunnels, and what better way to encourage children to play in the garden with you than by planting a rainbow of carrots - orange, white and deep purple. Orange carrots are fine, but it's the dark purple and soft creamy white that really draws me in.. these should be fun to grow - and eat!

Leaf Lettuce 'Garden Ferns' - How fun is this? We love our lettuce, and I must admit that I'm partial to leaf lettuce varieties. This unusual heirloom bears very large rosettes that are packed full of ruffled, lacy leaves. According to Renee, the leaves are sweet and delicately flavoured.. I can't wait!
Baby Cabbage 'Pixie' - Cabbage is also a family favourite, but sometimes the plants take up too much space - especially in a backyard plot. Pixie is a good choice for urban or small spaces because the plants are compact, requiring less room than traditional varieties. The dense heads grow just 5 to 6 inches across - the ideal size for 2 people! These small-growing cabbages might even be ideal for the autumn cold frames.. the heads would hold in there for months.. hmmmm..

Signature Salads 'Wine Country Mesclun' - To be honest, it was the name that first lured me in.. Wine Country Mesclun.. doesn't that sound soooo gourmet? But I really don't need another lettuce this year - I've got too many packets in my seed boxes already.. Then, I read the listing of greens that are included in this mix - 8 coloured lettuces, arugula, spinach, 3 types of Asian greens and 2 chards - I was hooked.. Clear some garden space, I'm going to plant myself some Wine Country Mesclun!

White Corn 'Sugar Pearl' - Now that our four photo shoots for my upcoming book (The Year Round Vegetable Gardener, Dec 2011) are done, I told the kids they could have the run of the garden this summer.. What do they want to grow? Corn - and lot's of it! Thank you Renee for this gourmet treat. Sugar Pearl has meltingly tender kernels in a soft shade of cream. Top quality ears for a short season garden. Perfect!

Mounding Nasturtiums 'Buttercream' - A gorgeous heirloom nasturtium, Buttercream has semi-doubled soft creamy blooms that will attract both beneficial and pollinating insects. I love to plant a wide variety of nasturtiums and this will look lovely planted next to my deep burgundy 'black flowering' nasturtiums. Plus, the leaves, flowers and seeds of this favourite annual are edible!
Happy Gardening!

 Wow.. 200 posts.. where has the time gone? I'm sure I should say something profound and meaningful for my 200th post, but why start now?!? Instead, I'd like to celebrate with a few photos from the past year.. with a HUGE snowstorm on its way here (tomorrow night and 30+ cm of snow), I'd like to think happy garden thoughts!


